Strengthen Your Core and Burn Belly Fat At Once

I always get asked what the BEST ab move is AND how can one can get rid of belly fat. abs

To me, these are sort of different questions: one is functional and one is aesthetic.

The BEST ab move to strengthen the core is anything plank related.

This strengthens the transverse abdominus muscle – there are actually 4 layers of muscles in your core (see here) ===>

As for getting rid of belly fat, that’s something a little different. While there are some studies to show that LOCAL thermogenesis (increase in temperature) will help spot reduce, the BEST way to both strengthen the core and reduce belly fat is to do metabolically expensive core related exercise, like in these workouts.

First, here are some tips for doing a plank:

Here’s a workout that will strengthen your core AND get you in a hot and sweaty mess with JUST your bodyweight:

Bodyweight workouts can’t be beat. Here’s one called ‘Planks for the Abs’

Here’s the timing:
45/10 advanced
30/10 intermediate
20/10 beginner

Do three rounds

squat jump (full body extension)
plank jack (plank)
side plank
side plank
burpee
plank with alt leg lift

What’s great about this workout is that there’s a definite emphasis on the core, but you’ll also boost your metabolism with the heart pounding squat jump and burpees (which also engage the core).

Win – win!

Strengthen the core and burn off belly fat at the same time…

If you love variety, you’ll love this Metabolic Bundle where you’ll get 18 core strengthening and belly fat burning workouts: 6 bodyweight , 6 burpee workouts and 6 Challenge Complexes. All these workouts come with videos to ensure that your form is right on.

metabolic bundle

Burn belly fat AND strengthen your core all at once with these calorically expensive but financially INEXPENSIVE video workouts šŸ™‚

Click here and use the coupon code LookBetterNaked on the check out page to get 50% off!

Guest Post: 5 Tips to DOMINATE Your Double Unders

Howā€™s it going? Robby Blanchard here!

If you are reading this blog post right now then you already know and love Shawna and her awesome training, Challenge Workout programs and her pullups. I mean, Shawna can bust out pullups like nobodyā€™s business…how awesome is that?! But on top of all that she is an awesome person and coach.

So the other day me and Shawna were speaking on the phone and she had asked me to write a guest post today to give you some tips on how to do a double under.

I guess you could say she ā€œropedā€ me into doing it…bada bing!

double under 1

Donā€™t know what a double under is? Donā€™t worry…we will get to that in a second. But before I do…let me tell you a little bit about me…
I love to golf, I have an unhealthy obsession with sneakers and I love to ski. In fact, as Iā€™m writing this right now we are in the middle of getting almost 3 feet of snow in the Blizzard of 2015 here in Boston so Iā€™m pretty excited to hit the slopes later.

I have also been a coach and trainer for almost a decade and for the last four years Iā€™ve owned a CrossFit Box (which means gym in the language of CrossFit…donā€™t worry Iā€™ll be your translator).

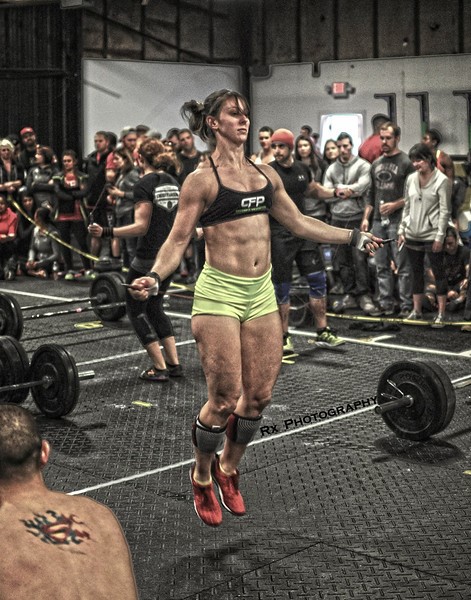
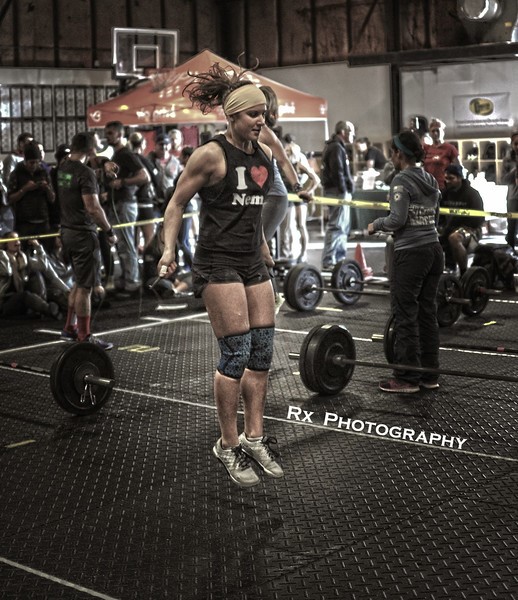
In CrossFit we incorporate a lot of jump roping into our workouts. Of all the jump rope movements that you can do, the Double Under is the ā€œgold standard.ā€ Double Unders are basically when you swing the jump rope underneath you twice in one jump…hence the name, Double Under.
It really is an awesome movement because A.) it looks cool to do and B.) If normal jump roping can burn 19 calories a minute…just imagine the calorie burn that you can get from double unders šŸ™‚

This movement can be hard to learn at first if youā€™ve never done it before. In fact some members of my gym would take up to 6 months to learn how to do a double under. And of course there would be many whip marks along the way.

Honestly, it shouldnā€™t take you 6 months to learn this movement. In fact, if you follow a program like my Dominate Your Double Under ProgramĀ it can take you less than 21 days. I want to help as many people as possible learn how to do double unders because its an awesome fat burning exercise and is such a great way to tone and strengthen your body.
Without further adieu, here are 5 tips that will help you get closer to dominating your double unders in your next workout.

double under 2

1. The Setup:

In order to be successful in double unders, you need to be set up correctly with your jump rope.
Feet should be underneath your hips.
Stand tall with your arms slightly bent at your side.
Look straight ahead but should still be able to see your hands with your peripheral vision.
Also, thing about keeping your arms in tight…as if your triceps were stuck to your sides.
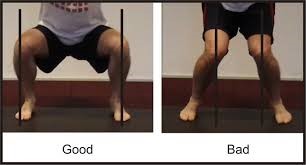
2. The Jump:

It’s important that when you are jumping that you keep your feet underneath you the entire time. You don’t want to donkey kick (kicking your legs back) or pike (kicking your legs forward). Both of these will make it really hard to rebound off of the ground. By keeping your feet underneath you, this allows you to stay light on your feet and rebound faster.
Also, think about lengthening your jump as if you were trying to touch your head to the ceiling. Remember, that rope is less than a centimeter thick…so if you jump 6″ in the air…thats more than enough room for it to pass through twice!

3. The Wrists:

The wrists should be doing the most work when it comes to getting that rope around. It’s important to keep your arms in tight and use your wrists as that is the most efficient way to do multiple double unders in a row. Remember, as long as your wrists are moving faster than your jump, you’ll be in a good position to get a double under. Even if you have to slow your jump a bit, thats ok…just as long as your wrist speed is high and in sync.

4. The Rope:

There are hundreds of choices when it comes to a good speed rope. In terms of brand its really personal preference. However, its very important that you size your rope correctly. Make sure that those handles are no higher than your armpits (leave it a little longer if you are just starting out). Also, the handles are like the shaft on the golf club…the most important part. If you can find handles that spin smooth without resistance, this will help give you an advantage.

5. Practice:

Above all, there is nothing more important to learning the double under than being consistent in your practice. If you are consistent, you can learn in less than 21 days as I prove in my program.

The Double Under is an awesome movement that is extremely cool to learn. If you follow these five tips from my Dominate Your Double Unders programĀ  you will be well on your way to dominating your double unders and you will have another great fat burning too to add some variety to your jump rope and daily workouts.

Keep Rockin!
Robby Blanchard, MBA, BS, CPT

Robby is the Owner of CrossFit Reach and the Creator of Dominate Your Double Unders, a program designed to help you learn how to double under in 21 days or less. He is a CrossFit Level 1 trainer, CrossFit Olympic Lifting and CrossFit Strongman Certified as well as a USAW Level 1 Coach. Robby has over 9 years of experience in the world of Strength of Conditioning and uses his experience to help improve the health and fitness of everyone that is following his programs.

Guest Post: Do your knees have you on your knees?!

Do you have some aching soreness in the front of your knee just below your knee cap? How about some pain on the side of your knee every time you go up stairs? One of the biggest complaints people have that restrict them and their workouts is knee pain. Every time they bend down to do a squat or during sprints there is a nagging pain around their knee.

What is the cause and how can you fix this?

Well, there are a few things that can be going on. Are your knees buckling inward as you squat down? This causes increase strain on your patella and patellar tendon causing major discomfort! Making sure that your knees stay over your 2nd toe and your shins stay almost vertical when you squat will keep your knees from buckling in.

knee bends


This will help relieve your pain with your squats, jumping exercises (both take off and landing) and even stairs. Part of this buckling of your knees can be due to weak butt muscles. Doing exercises such as bridging and clams helps strengthen those muscles.

knee bends back


knee bends side


Another big problem that people have is muscle tightness. Two of the biggest offenders of this are the hip flexor muscles and the IT band. If your hip flexors are too tight (mostly caused by sitting too much) and canā€™t fully extend your hips, you wonā€™t be able to properly contract your glutes, again leading to your knees buckling inward when you squat.

A tight IT band can cause pain in a couple different ways. First, it is attached to your patella and if too tight can pull the patella out of its groove and not allow it to glide smoothly. This can scratch up the back of the patella causing pain. Also just by pulling the patella to the side, the direction of the forces that go through your knee are changed and can cause strain and pain in the patellar tendon. In addition there is a small bump on the outside of your femur that your IT band moves over every time your knee bends more than 20 degrees. If the ITĀ  band is too tight as it passes over the femur it creates friction and pain.

To reduce the tightness in these two particular areas there are several choices, basic stretches for each area such as a kneeling hip flexor stretch

kneeling hip flexor stretch


and a seated twist for the IT band help.

seated twist


Foam rolling is great for breaking up adhesions within tissue allowing for better movement both in the IT band and hip flexor. Roll over the IT band starting all the way at the top of your hip all the way down to your knee. Use your other foot and arm to guide you as you roll from top to bottom. Try to roll for a minimum of one minute per side. To roll your hip flexor, place your upper thigh on the very edge of the foam roller. Bend your opposite hip and knee about 45 degrees each. Now using your forearms and opposite knee guide yourself over the foam roller, again for about one minute on each side.

Finally using a lacrosse ball to pinpoint some especially tight areas can also help with tightness. This one definitely doesnā€™t tickle! Lay face down on the floor. Place the lacrosse ball directly under your hip flexor and breathe as you allow yourself to press down onto the ball. Deep breathing allows you to relax and your tissues to release over the ball releasing tightness. Again do this for about one minute per side. Now lay on your side and place the ball along the top of your hip. This is the tensor fascia latae muscle, the origin of the IT band. You can place the ball under several spots up here and then gradually move down the side or your hip.

All of these methods are helpful but are best when used in conjunction with each other.

For more tips on how to ‘fix your knee pain’, check this out:

fix my knee pain prdt grp


Article By: Beth Drayer MS, ATC, CSCS

Beth Drayer is a Certified Athletic Trainer and Strength and Conditioning Specialist. She earned her BS in Kinesiology form The Pennsylvania State University and MS in Exercise and Movement Science from the University of Oregon. Her professional career spans teaching group classes from high school to 70+ and personal training to working Division I college athletics for over 10 years. Gaining a wealth of experience and knowledge yearly by attending conferences and summits to learn from the best in her field, she has built a substantial tool box and a unique approach to training and fitness. Her own fitness accomplishments include finishing several triathlons, a marathon and Spartan Race. She also enjoys hiking and playing various sports from tennis to volleyball and has recently started the study of Sholin Karate.

Beth Drayer


Sexual harassment or yoga? (my experience)

I know that yoga really has a calming effect during stressful times, right?

Oo-o-m-mmm…

I hate yoga.

I’m sorry, I just have to be honest about it.
The reason I don’t like yoga is not with ‘yoga’ itself so much,but more about
my first yoga/sexual harassment experience. I really need to give yoga another
go because my experience was likely not typical.
I’ve since had a BETTER experience with THIS.

I’ll tell you a few reasons why I initially got turned off yoga:

To begin, in the hot yoga session I tried, I was faced with a man in his junior
high gym shorts. It seemed that clothing was somewhat optional at this session
and I wasn’t really up for the sights.

The woman beside me was doing this annoying breathing that I thought was reserved
only for child birth. I felt only slightly guilty when I accidentally poked her
in the eye during this weird wall pose that the instructor had us doing.

By the way, at the wall the instructor kept pressing himself into me (deodorant optional
at this place), I’m not really sure what he was trying to correct. Now, not to be judgmental,
but he seemed very much like he batted for the other team, so I was somewhat disarmed at first
about his ‘corrections’. But then…

Upward-facing_dog_pose


I was in a cobra pose (See? I know some things about yoga) and this instructor sat on my hamstrings
and grabbed my a$$ and told me my glutes were too tight. (Let me tell you I was clenching by this
time šŸ˜‰

That was it! This was not yoga so much as sexual harassment.

So, truthfully, my yoga experience was probably not anything yoga-like.

Aside from this experience, I know the benefits of yoga (even if you have to stay quiet for a long
time and line up your mat exactly so….)

I think I’m much better suited for something I could do on my own. Like this program I’m about to
tell you about…

This is from my friend and body-sculpting expert Kris Fondran.

She’s in her 40’s now. She’s got a lean, toned and shapely body.

And the only exercise she does is cardio flow.

=> Discover Kris’ system

Her workouts have been shown to be one of the most effective workouts for fighting stubborn fat
stores, ESPECIALLY the ones that crop up after age 40.

Studies show that it lowers levels of stress hormones and increases insulin sensitivity–a signal
to your body to store food in lean tissue rather than store it as fat around your belly.

And you don’t need ANY equipment to do it. My friend Kris describes the entire system on the next
page.

=> Zero in on ugly bellyfat with short, portable exercise routines

When Kris started telling me about all the research that backs up the fat burning and health
enhancing benefits of the methods she teaches, I was amazed at how thorough it is. You can see
some of the top research for yourself highlighted on this page.

I figure this is a good way to reap the benefits of yoga without having to file a sexual harassment
suit.

PS. If you’re a big yoga fan, sorry if I offended. I actually did a ‘flow’ routine yesterday.
It was my day off from my usual training, and man, did it feel good.

See? Apparently you can teach an old dog new tricks šŸ˜‰

If I can learn it – and I’m sort of yoga-phobic after this sexual harassment experience, then
anyone can!

As well, I’m headed back to see my Dad in the hospital again this weekend and this is the perfect
routine to take with me to do at my sister’s house – stress busting – no equipment – feel good –
win/win/win!

Check it out šŸ™‚

What’s Your Favorite?

What are YOUR favorite workouts?

I put this to my VIP coaching group because we’ve had opportunity to switch plans every 21 days and I wanted to get their input.

It seems that the Metabolic Resistance Training module was a big hit.

If you’re unsure what a MRT workout is, let me explain…

Anytime you use supersets or circuits and train with an elevated heart rate with insufficient recovery, youĆ¢Ā€ā„¢re doing metabolic resistance training.

These workouts in particular, your focus should be to increase the weight that you use in the workouts. Speed isnĆ¢Ā€ā„¢t as important as impeccable form and added resistance.

MRT or metabolic resistance workouts are tough! As I said, your goal is go AS HEAVY as you can for each of the exercises, but MAINTAIN PERFECT FORM.

My VIP clients loved (hated!) this one:

The Squat Challenge

Challenge: This is a ladder set. Your goal is to get to 10 reps and return to 1 rep without racking the bar.

The next time you do this workout either increase the weight, decrease your total workout time, or make sure you rack the bar later into the workout (itā€™s very tough to do the entire workout without racking the bar!)

Choose a barbell squat weight that you can do 15-20 reps with good form. The rest period is a bit of a guess but Iā€™ve found this method the best as opposed to fumbling with a timer.

For each rep, I count ā€˜1-mississippiā€™. So after doing rep #1 Iā€™ll count ā€˜1 mississippiā€™ and after doing rep #10 Iā€™ll count ā€™10 mississippiā€™sā€™.

  • Do 1 rep, rest 1 count
  • Do 2 reps, rest 2 counts
  • Do 3 reps, rest 3 countsā€¦

Continue until you get to:

  • Do 10 reps, rest 10 counts

Then reverse the order:

  • Do 9 reps, rest 9 countsā€¦

Continue until you get to:

  • Do 2 reps, rest 2 counts
  • Do 1 rep

The VIP’s had each other to lean on to get through this one! They were each others’ best cheer leaders; I loved to see the healthy competition that was born as they went through this workout.

If you think you’d benefit from a like-minded group to help you reach YOUR fitness goals, then you’ll want to consider my VIP coaching group.

I’ll be starting a new coaching program on January 18th. Many of you have already requested to get in so I’ve created an ‘advance notice’ list.

You can go HERE to get on that list and potentially get in the group before I officially open it up. Here’s what two of the members have to say about coaching:

vip fb post from Bob


Each day VIP’s check in with a rating for their W (workout), N (nutrition) and M (motivation):

love the group


Here’s a little about what you can expect from the group:

  • The purpose of this group is to CHALLENGE and IMPROVE your current fitness level (obviously).
  • We undertake challenging workouts together, but the challenges are totally scalable – you are competing with YOURSELF.
  • You’ll get a NEW program every 21 days.
  • You’ll be ACCOUNTABLE to me and the group for your daily training.
  • You’ll have similar goals with the rest of the group because this is the ‘secret sauce’ to making things work.
  • We’ll address your nutrition needs with a doable plan. (Your physique WILL change – for most of you that means FAT LOSS.)
  • As for nutrition – you’ll get a proven plan, get support and report in daily.
  • I’ve brought on a nutrition coach to help with ALL your nutrition needs.

Get on the advanced notice list HERE and let me and the VIP’s help you meet your 2015 fitness goals.

Enjoy that workout! And feel free to post YOUR favorite workout in the comment section.

fav module 3