Back Fat Workout Solution

Got back fat? Ug. sexy back funny

At one time I thought that ‘trouble spot’ training was useless. However, recent studies show that there’s a thermogenic effect from training specific body parts so that you can, in fact, make an impact on a troublesome area.

The BEST plan of attack is to pair up body part specific exercises with metabolically challenging exercise to get the most ‘bang for your buck’.

You can’t expect to simply do a single exercise like biceps curls, sit ups, donkey kicks or what have you to tighten and tone up an area without raising your metabolism to burn away fat.

Long story short: you CAN exercise the muscles in your trouble spot areas and get the results you long for, as long as you work really hard. Sweat and raising your metabolism are imperative.

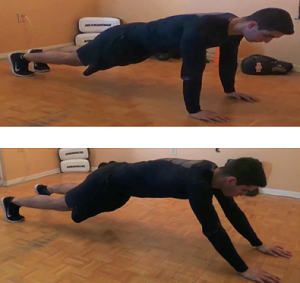
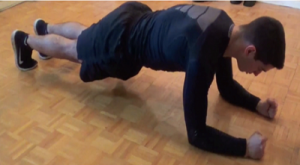
Here’s a fun back fat blasting workout for you.

Set your timer for 30 seconds of work with a 10 second transition. Repeat this circuit three times through for just over 10 minutes of sweaty work.

  • wall sit stick up
  • DB row (weak side)
  • Db row (strong side)
  • squat jumps (full body extensions or squat jumps with shoe touch)
  • plank recovery

Now ladies in particular, if you find that your bum is YOUR trouble spot and needs some attention (because it’s NOT getting the type of attention you’d like 😉 ), then I have just the solution.andrea albright sept 2014

My friend, Andrea Albright has a program that focuses mostly on working the glutes.

Guess what? She’s found that if you have a great butt, the rest of your body more closely resembles your dream body.

Think about it. Have you ever met a woman with a nice bum who didn’t have an otherwise great physique?

I recommend that you take a look at Andrea’s program: My Bikini Butt.

Screen Shot 2014-09-21 at 11.06.52 AMYou’ll find both demo and workout videos, along with a TON of content from nutrition to lifestyle changes that you need to make to easily help you make the most of YOUR body (and bum).

Now, Andrea has a particularly disturbing story as to how she became the fitness guru that she is. She has a video describing it all here.

If you don’t have time to listen to her story though (it’s actually quite compelling!), then just scroll down and you’ll learn all about her program and WHY it works.

Trouble spot training IS possible when you’re pairing the right exercises in the right combination.

Whether you have back fat or butt fat, doing specific exercises that target those muscles along with metabolically challenging ones will have you looking great from any angle.

Check Andrea’s program out here.

Workout Recovery Tips

I did a little survey this week and got this question:

How do I  keep the soreness after a workout to a minimum? After I work out it takes me days to recover.

It’s true, I notice that as I get older, my recovery time is a little longer. Aches and pains force me to train smarter and have made me think hard about what to do between workouts.

The smarter I am between my workouts, the better I feel, the less tight I am, the faster I recover, the harder I can go in my next workout and the better results that I get.

Makes sense right?

While I’d love to have a weekly massage to aid recovery, it’s not always possible with limited time and funds so I make sure I do some active recovery tricks in between my hard training sessions.

These recovery tricks are from my good friend, Rick Kaselj. These tricks only take me a few minutes but they lead to so many benefits which include faster recover,  less soreness and injury avoidance.

You’ll see a video on a few of the tricks I do here:

I like using a foam roller. In the video, you’ll see that I use the roller on my hamstrings and especially my IT bands. Often time knee pain can be caused by a patella that isn’t tracking properly, so I always try to roll out my IT bands and I’ve noticed my knees feel much better.

If I’m traveling, I may not want to take my roller with me. In this case, I often will use a tennis ball (or hard ball of any sort will work). In the video, you’ll see that I use the ball on my elbows, but I also use it for my middle back or anywhere that I may have an ache or pain.

The bottoms of my feet get very sore (sometimes it’s my own fault for not wearing proper shoes when I jump rope). I often will get a cold can of soda and roll my foot over it to loosen up the fascia on the bottom of my foot.

Check out a few of the recovery tricks that I do here.

You’d be surprised at all the various ways you can help yourself recover from workouts. I like to roll right after my workout; I even have a roller in my bedroom and will roll a little before bed.

If I had a hot tub, I’d do some of these recovery tricks after soaking. A hot bath works just as well. It’s a brilliant way to loosen the muscles up before doing some rolling and other recovery tricks before bed. This allows me to sleep better, recover faster and hit my workouts harder.

If you’d like to learn some of the many recovery tricks I’ve learned, then you need to check out this program from Rick Kaselj. He has dozens of recovery tips and tricks laid out easily, with video demonstrations and easy to follow directions here.

Everyone gets sore from time to time and having some techniques to ‘recover’ from muscle soreness is key.

It’s not like the ‘olden’ days where doctors just told you to ‘rest’ for six weeks, or six months or six years…While rest can be helpful when you’re feeling an ache or pain, it does little to SPEED up the recovery time.

One key of these techniques is that through active massage, it forces blood into a sore area which helps the body heal as it sweeps out the bad stuff 😉

If you’re curious as to how you can recover faster and perform better, make sure you check out this page…I know you’ll like the format and step by step instructions that literally make your aches and pains disappear and your exercise performance improve.

> 5 Recovery Workouts that Everyone Should Do <

Guest Post – A New Approach To Training Your Abs

On a recent trip to Vegas, it was the Mayweather VS Maidana match. While I didn’t go to the fight, there was plenty of press surrounding it, so I couldn’t help but notice how RIPPED these fighters were.

The first thing I thought of, is what kind of training, do these guys go through?

So, I asked my good friend, Andrew and he was kind enough to share this post with us.

By Andrew Raposo 

I see it all the time… countless reps of different types of ab exercises.

100 reps of Crunches
100 reps of Russian twists
100 reps of “Ab bicycles”

My question is… WHY?

Do you train your other body parts like that?

I hope not…

As a matter of fact, have you been getting any type of results from this type of ab training?

If your answer is no, then I highly recommend that you read on. Today, I’m going to show you how to train your abs for STRENGTH. You don’t train strength by doing 100+ reps of an exercise.

You ever wonder if you can specifically target the fat around the midsection? This is how you do it.

The new approach that you’re going to learn about ab training is by training your abs like a fighter.

Fighters have the most RIPPED Abs in any other sport you see on TV. They also have the strongest midsection in sport. Why not train abs like them?

The difference between fighters and everyone else is that fighters train their abs for strength.

Just imagine getting punched and kicked repeatedly towards your midsection. You better believe you have to train your abs differently.

The best part is you don’t have to use one piece of equipment. All you need is your own bodyweight. Now you’re probably wondering, “How do you train your abs for strength with just your own bodyweight?” I will show you how.

Today, I’m going to give you a sample ab-training workout that the top-level fighters use to get their ripped chiseled abs and have core strength that will blow you away.

Without further delay, let’s get right into the workout.

Fighter Ab-Training Circuit

Box Plank – 10 Reps Each Side
Long Plank Walkouts – 5 Reps
Hardstyle Plank – 10 Sec x3
Rest 60 Sec

Repeat for a total of 3-5 rounds.

If it’s your first time doing this circuit, start with 3 rounds and work your way up to 5.

Now you’re probably wondering what these exercises look like. Check out the descriptions of each exercise below.

Box Plank

Box Plank

• Start in a quadruped position. Knees underneath the hips and hands underneath the shoulders.
• Brace your abs and get your knees off the ground.
• Keep the abs braced and without moving the hips, get one hand off the ground.
• Repeat with the other hand.

Long Plank Walkouts


Long Plank Walkouts

• Get into the top of a push up position.
• Walk your hands forward until they are above your head while keeping your abs braced.
• Walk your hands back into the top of a push up position.
• Prevent the hips from swaying side to side when performing the movement.

Hardstyle Plank

Hardstyle Plank

• Start in a plank position on your elbows.
• Make sure there is a straight line from your head to toes and hands away from each other.
• Squeeze your abs, glutes, quads, and fists as hard as you can.
• Drive your elbows to your toes as hard as you can.
• Hold this tension for 10 seconds and then rest for 5 seconds.
• Repeat this 2 more times.

There it is, a real ab workout that will get you on the road to having ripped abs like a fighter. You can perform this circuit at the end of a training session or even on an off day. You get much better results when you train your abs like this rather than performing countless reps of a random ab exercise.

If you would like more workouts like this, check out Fighter Abs for done for you videos and a complete step-by-step guide in getting you Six-Pack Abs with just your own bodyweight.


About Andrew

Bio Picture

Andrew is a North American Super Middle Weight Muay Thai Champion and a Two Time Provincial Gold Medalist in Boxing. Andrew is a passionate Fitness & Strength Coach and runs a private practice out of Toronto, Canada. Where he trains high-level fighters for competition as well as transform average bodies into extraordinary results with his unique approach to training. He is also the Creator and Author of Fighter Abs.

Vegas Baby – 10 Minute Workout

I’m in Vegas with some of my favorite fitness folks. las vegas sign

Unlike most Vegas trips, this is not a ‘what goes on in Vegas – stays in Vegas‘ type trip.

The purpose of this trip is to ‘mastermind’ with the best in the biz. We come here once a year to meet and share strategies on how to help our clients best. It’s not to say we don’t have a good time, but it’s mostly biz.

I’m pretty happy to see my friend, Derek Wahler here. He tried to make it to the Turbulence Training Summit in June 2014 but spent 10 days in the San Diego hospital instead. He recently had another health set back. He’s a dude that’s tough as nails and his health issues came totally out of the blue and nearly killed him. Literally. You can read more about that story and how it motivated him to help others achieve their own fitness goals even more.

In any case, I’m just happy to see him here alive and well!

If there were ever a time to have NO time to train, it’s at meetings like this in Vegas. We sequester ourselves into a conference room from 9am to 5pm or later and in the remaining time we try to hang out and take in some Vegas fun.

But for me, a workout just HAS to happen.

The good news is that with a bunch of fit pros around, there’s no excuse or lack of training ideas. Derek  shared this workout where if you have only 10 minutes, you can hit your entire body with HIDT (High Intensity Density Training):

  • Prisoner Squat (12 reps)
  • Spiderman push up (6 reps/side)
  • Burpees (12 reps)

Do as many circuits as possible in 10 minutes, resting only when needed.

Use these NO-EQUIPMENT 10-minute Stacks anywhere

If you have just 10 minutes today, you can still get results by using HIDT (although it’s not easy). That will be your MAIN workout.

If I have time later in the day, (another 10 minutes), I can boost my fat-burning by adding another 10-minute stack. And if I’m really on it, I can add a third ‘stack’ to boost my fat burning (and maybe offset a little of the restaurant food I’m eating).

You’ll get results with just one ‘stack’ because of the volume of work you put in (aka density), but because you won’t need any equipment, you can “spread” these 10-minute stacks during the day for even BETTER results.

Why does this work?

A study at the University of Missouri put people into two groups:

Group A – One long bout of exercise done in the morning

Group B – Intermittent bouts of exercise during the day (over

12 hours)

Blood samples were collected every 10 min and measured for glucose, insulin, and c-peptide concentrations.

(Insulin and glucose contribute to your body’s ability to burn fat while at rest.)

After 12 hours, the group that used short bouts during the day had lower insulin levels than the group that did one bout of exercise in the morning.

Lower insulin = increase your body’s ability to burn fat

So, no matter how busy your schedule is, or even if you find yourself in Vegas, you can still burn fat and get YOUR beach body thanks to this new research.

10-Minute Stacking Solution <= Perfect for busy people like you

Morning 10-minute HIDT = Good Results

“Stack” another 10-Minute HIDT = Better Results

Do this mid-day as HIDT suppresses your appetite and you’ll eat less (SCORE!).

Advanced – “Stack” a third HIDT = BEST results

Here are 280,840 HIDT combinations so you’ll NEVER plateau

… all with ZERO equipment.

If you don’t have your health, you don’t have much and Derek’s brush with death motivated him to push his mission.

Not only are his 10 minute ‘stackable’ workouts fantastic, you’ll also see that he’s added a ton of bonuses and lowered the price for his program to make it affordable to everyone.

derek w 10 min product grp


Literally ANYONE can get fit if you have 10 minutes and only $17. Find out more HERE.


Fix Your Kettlebell Clean

Guest Post kb's

By Forest Vance

Level 2 certified Russian KB Instructor

Kettlebell Challenge 2.0

The kettlebell clean is possibly the toughest to MASTER of the basic KB drills (“basic” kettlebell exercises being the swing, squat, Turkish get up, clean, press, and snatch).

The goal is to clean the ‘bell up from the ground in one smooth movement into a perfect rack position at the shoulder. But commonly –

– The starting positon / “set up” for the clean is done wrong

– Folks get TOO MUCH hip drive, and end up whacking / brusing up their forarm in the process

– The KB takes the wrong path on the way up, making the exercise much harder (in a bad way) and causing extra stress on the elbow and shoulder in the process

SO, here’s a video that will show you how to fix the problems listed above – a few more – in about two minutes! Take a pause from whatever you’re doing and check it out below.

And, don’t forget – as part of Forest’s “FVT Baby Sale” going this weekend, he has one of his best-selling kettlebell programs for 50% off:

 kb challenge 2.0

=> Kettlebell Challenge Workouts 2.0

So if you enjoy the video, be sure to check out his program as well 😉

=> Kettlebell Clean Technique Tips